Yes, new plants can absolutely grow from the leaves of Bryophyllum, and the process is one of the most reliable forms of vegetative propagation in the plant world. The tiny plantlets you see lined up along the leaf margins are not a curiosity or damage, they are fully formed miniature plants complete with their own embryonic shoot and, eventually, roots. If you have a leaf with visible plantlets right now, you can start the process today.
New Plants Can Grow From Bryophyllum Leaves: How To Propagate

Dr. Marcus Weatherby
1 May 2026
Why Bryophyllum leaves produce plantlets
Bryophyllum is a group of succulents native to Madagascar, now widely recognized as a subgroup within the genus Kalanchoe in the family Crassulaceae. You will see them sold under names like Kalanchoe daigremontiana (mother of thousands), Kalanchoe pinnata, or Kalanchoe delagoensis, and the naming overlap is completely normal since taxonomy has shifted back and forth over the years. For practical purposes, if your plant is producing small plantlets along its leaf edges, you are working with a Bryophyllum-type Kalanchoe.
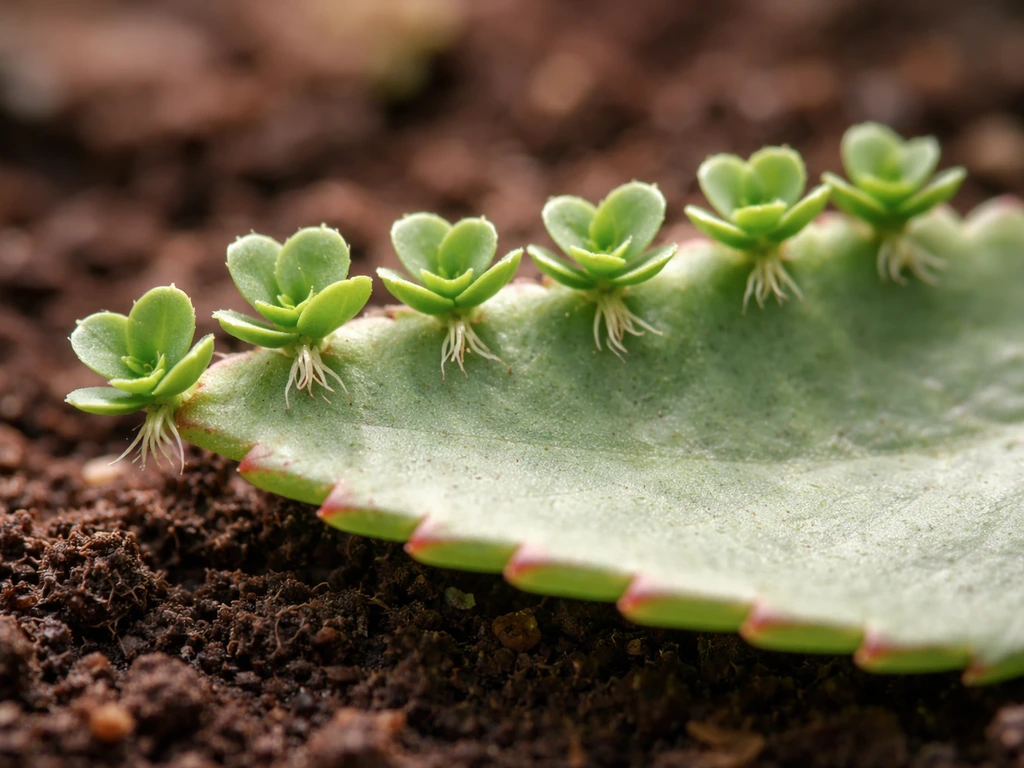
The biology behind this is genuinely fascinating. Each leaf carries embryonic tissue tucked into tiny pits located near the leaf margin, particularly along the notched or toothed edge. These pits are extremely small, around 0.25 mm in diameter, but they contain the genetic programming to initiate an entirely new plant. The developmental process is so similar to seed embryo formation that botanists describe it as somatic embryogenesis: the leaf essentially grows a series of embryos along its edge without any fertilization involved. Plantlets form in a disto-proximal sequence, meaning the ones closest to the leaf tip tend to be more mature than those near the base, which is useful to know when you are selecting which ones to harvest.
Environmentally, plantlet initiation on the parent plant is triggered by long days and mild drought stress. This is a survival adaptation: when the plant senses dry or bright conditions, it ramps up plantlet production along leaf margins, effectively scattering future offspring before conditions worsen. Understanding this helps explain why a Bryophyllum sitting in a bright, slightly dry spot indoors tends to produce the most plantlets. It also explains why these plants are so successful at colonizing disturbed ground in warm, seasonally dry climates well beyond their Madagascar origins.
How to tell leaf plantlets vs normal leaf damage
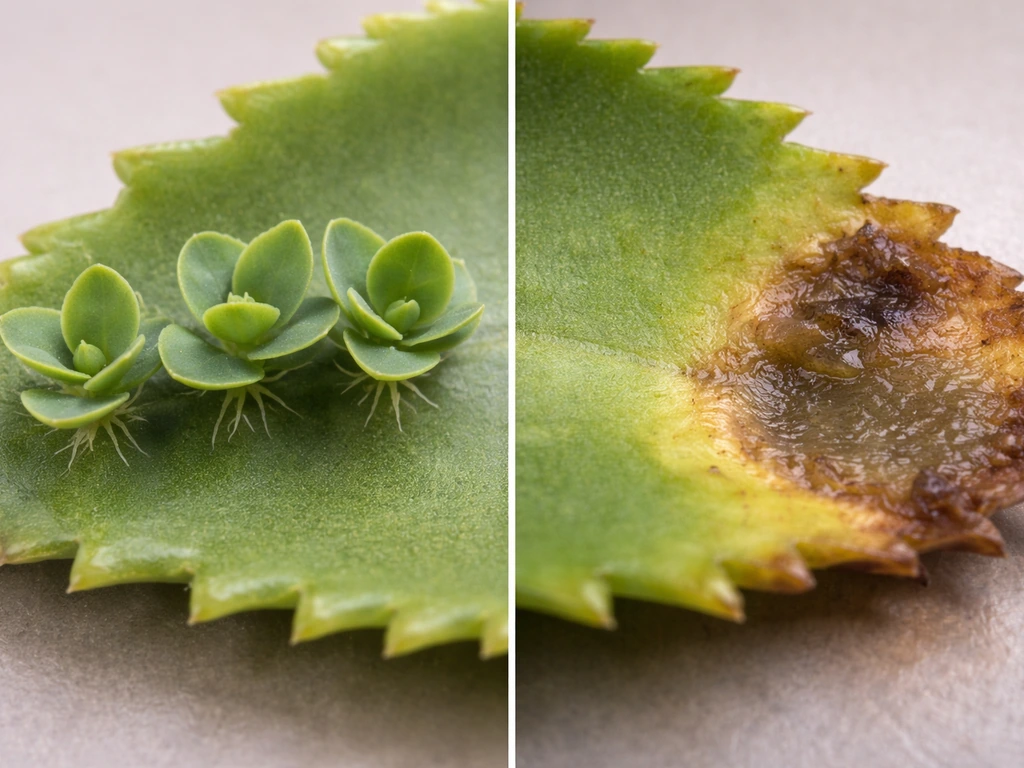
This is one of the first questions people ask, and it is easy to sort out once you know what to look for. Genuine plantlets are organized, symmetrical, and always positioned in the leaf notches or along the serrated margin. Each one looks like a tiny replica of the parent plant: it has a distinct stem-like base (the swollen pedestal that will later produce roots), paired miniature leaves, and a uniform green or sometimes reddish color. They are arranged in a row along the leaf edge, almost like a necklace. For more details, see these 10 examples of plants that grow from leaves.
Leaf damage or decay looks completely different. Browning, yellowing, or soft mushy spots can appear anywhere on the leaf surface, not just at the margin notches. Fungal damage tends to spread in irregular patches and has a different texture, often sunken or water-soaked. Insect damage shows as ragged edges or stippling. If you see a small structure sitting squarely inside a notch, symmetrical and green, that is a plantlet. If you see something soft, discolored, or randomly placed on the flat surface of the leaf, that is damage.
One more thing to watch for: very early-stage plantlets may look like tiny green bumps before their leaves fully expand. Do not confuse these with normal leaf texture variations. Give it a few days and they will elongate noticeably. The ones worth harvesting are at least 1.5 cm long and may already show tiny white bumps or translucent filaments at their base, those are root primordia, and their presence means the plantlet is ready to establish on its own.
Step-by-step propagation today
You do not need special equipment. Here is exactly what to do, in order, starting right now.
- Select plantlets that are at least 1.5 cm tall and show tiny white root primordia at their base — these are the nubs or translucent filaments at the junction between the plantlet stem and the leaf margin.
- Detach plantlets gently using clean fingers or fine-tipped tweezers. Pinch at the base where the plantlet meets the leaf notch and ease it free with a slight rocking motion. Avoid scissors — they crush the delicate base tissue.
- Allow detached plantlets to sit on a dry surface out of direct sun for one to two days. This gives the wound site time to callus (dry out and form a protective layer), which dramatically reduces the chance of rot when you plant them.
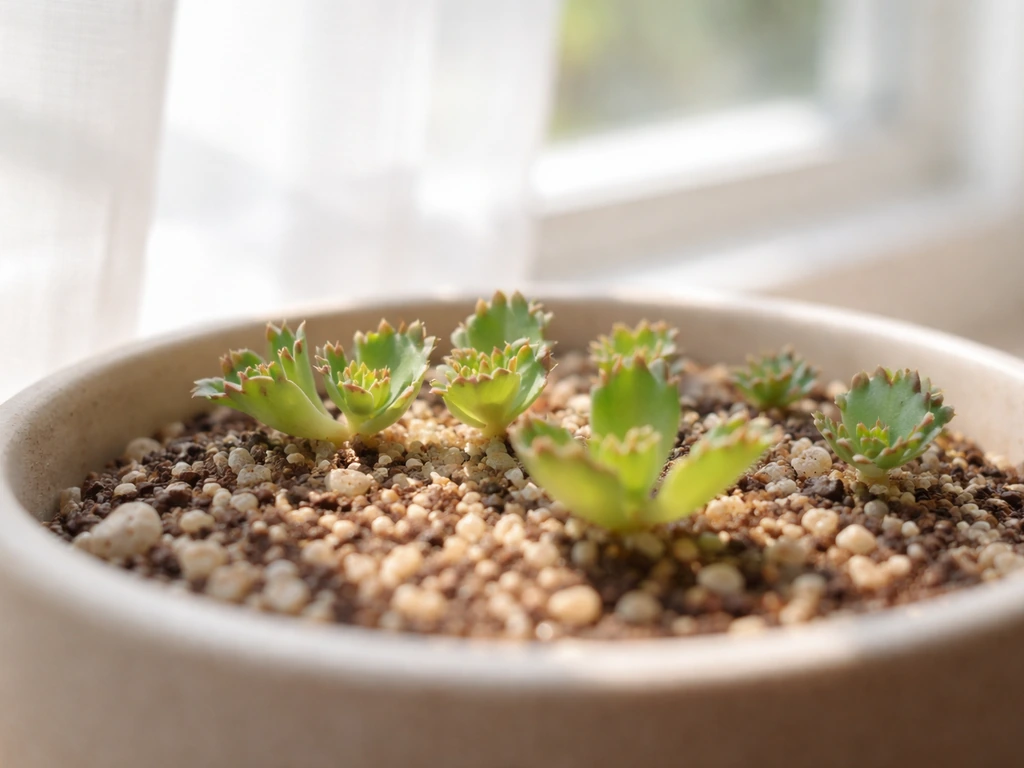
- Prepare a pot with a well-draining succulent or cactus mix. A good home blend is two parts commercial potting soil to one part coarse perlite or gritty sand. Avoid mixes that retain moisture for a long time.
- Place plantlets on top of the soil surface or press the base very lightly into the top 3–5 mm of mix. Do not bury them. The swollen base needs air circulation as much as it needs contact with the substrate. Spacing of a few centimeters between plantlets is enough.
- Mist the soil surface lightly — just enough to settle it. Do not water heavily at this stage. There is no root system yet to take up water, so anything more than a light surface misting will sit in the soil and rot the base.
- Place the pot in a bright, indirectly lit spot and wait. Roots typically begin emerging 10 to 15 days after detachment from the leaf, always at the junction of the plantlet stem with the base. You will see the first hairlike roots before any significant shoot growth resumes.
If you have an intact leaf that is already dropping plantlets naturally, you can also simply lay the whole leaf on top of damp succulent mix and let the plantlets touch the surface. Kalanchoë daigremontiana (formerly treated as Bryophyllum) can propagate vegetatively from plantlets on leaf margins, and those plantlets detach and spread into new plants blank" rel="noopener noreferrer">the leaf on top of damp succulent mix and let the plantlets touch the surface. The leaf will continue feeding the plantlets for a while, but remove it once the plantlets have rooted and the leaf begins to shrivel or rot. This passive method works well if you have many plantlets to establish at once.
Best growing conditions for newly rooted plantlets
Light
During the rooting phase, aim for bright indirect light for around 6 to 8 hours per day. A windowsill with filtered light or a spot near a bright window that does not receive direct midday sun is ideal. Too much direct sun before roots are established will dry out the plantlet faster than it can recover. Once roots are confirmed (usually visible through the drainage hole or gently checked by lifting a plantlet), you can gradually move them to brighter conditions, since Bryophyllum is a sun-tolerant plant in its natural habitat.
Soil
Drainage is non-negotiable. Bryophyllum is a succulent adapted to well-drained, often rocky or sandy soils in seasonally dry tropical climates. Needle-like leaves are found in plants that grow on dry, well-drained ground where moisture does not linger well-drained, often rocky or sandy soils. In those conditions, water moves through the root zone quickly after rain and the plant experiences distinct wet and dry cycles. Replicate this in your pot: use a mix that drains fast and does not stay soggy. Avoid standard potting soil on its own, peat-heavy mixes, or anything marketed for moisture retention.
Watering
Once roots have formed, shift to a proper wet-dry watering cycle. Water thoroughly until water runs from the drainage hole, then wait until the soil is completely dry before watering again. Depending on pot size, light, and temperature, that drying interval is typically 10 to 14 days indoors. In humid climates or during cooler months, it can be longer. The single most common cause of failure with Bryophyllum plantlets is watering on a calendar schedule rather than checking soil moisture first.
Temperature
Bryophyllum is a warm-climate succulent and behaves accordingly. It thrives between roughly 16°C and 30°C (60°F to 86°F). Plantlets establishing below 10°C (50°F) will slow down significantly or stall, and frost will kill them. If you are growing in a temperate region, keep newly rooted plantlets indoors until nighttime temperatures are consistently above 10°C before considering any outdoor placement.
Timing, potting, and transplanting into the right climate
In terms of timing, the window from detached plantlet to rooted seedling is roughly three to five weeks under good conditions. The first two weeks are the vulnerable phase where roots are forming but have no capacity yet to absorb water. Weeks three through five, you should see visible root growth and the beginning of new leaf pairs on the plantlet. Once the plant has a root system you can actually see and the shoot is actively growing new leaves, it is ready to pot up into its first individual container.
For potting up, use a small container, a 5 to 7 cm pot is appropriate for a single plantlet. A pot too large holds excess moisture around the small root ball, which invites rot. Use the same fast-draining mix described above and settle the plant so the base is just at soil level. Water once, let it drain, and then treat it like an established succulent.
Transplanting outdoors depends entirely on your climate. In tropical and subtropical zones (USDA hardiness zones 9 through 11, or warm Mediterranean climates), Bryophyllum can go outdoors year-round once it has an established root system. In these climates, bright outdoor light and natural rain-dry cycles are actually ideal and will produce faster, sturdier growth than indoor conditions. In temperate zones, transplant outdoors only after your last frost date and plan to bring plants back in before the first autumn frost. In arid climates, outdoor placement in partial shade during the hottest months protects young plants from scorch while they are still small.
| Climate type | Outdoor transplant timing | Key consideration |
|---|---|---|
| Tropical / subtropical | Year-round once rooted | Avoid waterlogged ground; elevated or well-drained beds preferred |
| Warm Mediterranean | Spring through autumn | Bring in or protect during rare frosts |
| Temperate (cool winters) | After last frost, bring in before first frost | Treat as a seasonal outdoor plant or permanent indoor plant |
| Arid / desert | Year-round with afternoon shade when young | Water more frequently outdoors; check soil every 5–7 days in summer heat |
| Humid subtropical | Year-round with good drainage | Prioritize drainage; humidity can promote fungal issues at soil level |
Troubleshooting failed roots or rot
Most failures with Bryophyllum plantlets come down to three problems: overwatering, insufficient light, or harvesting plantlets before they were ready. Here is how to diagnose and fix each one.
Rot at the base

This is the most common issue, and it is almost always caused by too much moisture before roots have formed. The base of the plantlet turns translucent, then mushy, then brown. At this stage there is no recovery, the plantlet is gone.
The fix for next time is to let the detached plantlet callus for one to two days before placing it on soil, use a very fast-draining mix, hold off on watering for the first week, and never mist heavily.
For succulent propagation, WVU Extension notes that allowing cuttings or plantlets to heal and form a callus before repotting can reduce the risk of rot, and it stresses that proper drainage helps prevent root decay let the detached plantlet callus for one to two days. Remember: there is no vascular connection between a freshly placed plantlet and newly developing roots, which means any water you add to the soil just sits there.
No roots forming after three weeks
If you are past three weeks and still see no roots, check temperature first. Cold conditions (below 15°C) significantly slow rooting. Also check light: too little light means the plantlet has no energy to drive root growth. Finally, consider whether the plantlets were large enough when you harvested them. Tiny plantlets under 1 cm that had no visible root primordia at the base often fail to establish on their own. If your plantlets are still on the parent leaf, leave them longer.
Plantlets shriveling and drying out
This is the opposite problem from rot but almost as common. If plantlets are sitting in very bright direct sun before rooting, or in a hot and dry environment, they lose moisture faster than they can replace it. Move them to a spot with bright indirect light, away from heating vents or south-facing windows with intense midday sun. A very light misting (not watering) every few days is acceptable during the rooting phase if conditions are particularly dry.
Fungal issues on the soil surface
White fuzzy growth on the soil surface or gray mold on the plantlet itself usually means the environment is too humid and the soil is staying wet too long. Improve air circulation around the pot, switch to a grittier mix, and reduce any misting. Fungal issues are far more common in cool, humid climates or when plantlets are kept under a humidity dome, a practice that is sometimes recommended for leafy cuttings but is counterproductive with succulent-type Bryophyllum plantlets.
A quick reference for common mistakes
| Problem | Likely cause | Fix |
|---|---|---|
| Mushy, brown base | Watering before roots formed; no callus period | Callus for 1–2 days before planting; do not water for first week |
| No roots after 3+ weeks | Cold temps, low light, or plantlets too small at harvest | Raise temp above 18°C, add indirect light, harvest larger plantlets |
| Shriveling plantlets | Too much direct sun or heat before rooting | Move to bright indirect light; mist surface every few days |
| Fungal growth on soil | Overwatering, poor drainage, or high humidity | Better drainage, more air circulation, stop misting |
| Plantlets falling off before use | Normal: mature plantlets detach when ready | Collect fallen plantlets promptly and start propagation immediately |
Bryophyllum is one of the most forgiving propagation subjects you can work with once you respect its succulent nature and the need for a dry, airy rooting environment. The [leaf-margin plantlet system](/plants-from-stems/plants-which-grow-from-leaves) is the plant's own investment in its next generation, your job is mostly to stay out of the way, provide the right conditions, and avoid the single most common mistake of treating it like a moisture-loving plant. Get the drainage and light right, and you will have more established plants than you know what to do with.
Bryophyllum is far from the only plant that propagates this way. If you want a broader idea, here are 5 examples of plants that grow from leaves and form new plantlets the same way. Other species across very different plant families also reproduce from leaf material, including some surprising examples from both arid and humid environments. If you are looking for inspiration, here are 10 examples of plants that grow from leaves. If you are interested in exploring which other plants grow from leaves and how those methods compare, the same principles of warmth, drainage, and patience apply across most of them.
FAQ
Do I need to detach the plantlets, or can I root them while they are still attached to the leaf?
You can leave them attached. If the leaf is healthy, plantlets on the leaf edge tend to be more resilient because they keep receiving limited support while roots develop. Detach only once the plantlet is at least about 1.5 cm and you can see root primordia (tiny pale bumps or translucent filaments) at the base.
How do I tell if the base is rotting versus just forming roots?
Roots start as firm, tiny pale bumps at the pedestal base, and they grow outward over time. Rot usually looks translucent, then turns mushy and brown, and it spreads from the base even if the light is good. If you see softness or an unpleasant breakdown texture, discard the plantlet rather than trying to salvage it.
Can I speed up rooting by using rooting hormones or soaking the plantlets first?
For Bryophyllum plantlets, hormones are usually unnecessary and soaking can backfire because the base has no active vascular connection yet. If you want to experiment, stick to a very brief dry start (callus or firming time) and focus on fast drainage and warmth, those factors matter more than treatments.
Should I mist the plantlets or keep them under a humidity dome?
Avoid a humidity dome or heavy misting. The main risk during rooting is excess moisture staying around the base, which leads to rot or mold. If the air is very dry, a light mist of the air or a very occasional, tiny mist can be acceptable, but keep the soil mix dry and airy.
What soil mix works best, and what should I avoid exactly?
Use a gritty, fast-draining succulent mix, and consider adding extra perlite or pumice for more airflow. Avoid peat-heavy blends, moisture-retentive potting soil, and anything that stays wet for days. The goal is that after watering, the mix drains quickly and dries completely.
How often should I water while the plantlets are rooting?
Do not follow a calendar schedule. After placing the plantlet on the mix, wait for the initial rooting period without routine watering. During the first week, it is often better to keep it essentially dry (beyond the mix already having been slightly damp if you started with a leaf-on-soil method). After that, only water thoroughly when the mix is completely dry.
Can I propagate from just any leaf on the plant?
Leaf propagation works best when the leaf actually has developed margin plantlets with visible embryonic tissue. If the leaf has no notched-edge pits or plantlets (and looks intact and undamaged), rooting attempts are less reliable. If your plant is not producing plantlets, you may need to provide longer days and a mild dry stress to trigger them.
What temperature is ideal, and what happens if it gets colder at night?
Aim for roughly 16°C to 30°C. Below about 15°C, rooting slows a lot, so delays are common in cool homes or during shoulder seasons. If nighttime drops below 10°C, keep the plantlets indoors, because cold can stall growth and make the base more likely to fail if the mix stays wet.
When should I pot up, and what size pot prevents rot?
Pot up once roots are clearly present and the shoot is actively forming new leaf pairs, typically around three to five weeks under good conditions. Use a small pot, about 5 to 7 cm per plant, because larger containers hold extra moisture around a tiny root ball and increase rot risk.
Is it safe to propagate multiple plantlets in one pot?
It can work, but spacing helps. If plantlets touch each other or you cannot remove rotted ones quickly, one failure can spread mold. If you do group them, ensure each has its own contact area with dry, gritty mix, and provide strong airflow and bright indirect light.
How do I prevent mold or white fuzzy growth on the mix?
Treat it as a moisture and airflow problem. Let the mix dry fully between any wetting, reduce or stop misting, and use a grittier, more breathable mix. Also avoid crowding and keep plantlets in a bright area with gentle airflow, not stagnant, humid corners.
Can I propagate in water, or do I have to use soil?
Soil or a dry, succulent-appropriate rooting medium is safer. Water rooting increases the chance that the base stays wet too long before functional roots form, which commonly leads to rot. If you want to test alternatives, keep the base minimally wet and make drainage and drying time your priority.